Total Pageviews

Friday, December 28, 2012

Crispy Okras (करारी भिंडी की सब्जी)


Crispy Okras (करारी भिंडी की सब्जी)


Ingredients
§         Okra                  – 250 gms
§         Gram Flour          – 6 tsp (can vary the amount as per taste buds J)
§         Onions               – ½ cup sliced
§         Ginger                – ½ tsp thinly sliced
§         Oil                     – 8 tsp
§         Salt to taste
§         Carom seeds       – ¼ tsp (अज्वैन)
§         Onion seeds        – ½ tsp (कलौंजी)
§         Fenugreek        – ¼ tsp (मेथी दाना)

Dry Herb Powders :
§         Fennel                – 1 tsp (coarsely powdered)
§         Turmeric             – ½ tsp
§         Red chilly            – ½ tsp (can vary the amount as per taste buds J)
§         Garam masala      – ½ tsp
§         Coriander            – 1 tsp
§         Asafoetida          – ¼ tsp (हींग)


Method
1.      Mix gram flour and all the dry herb powders in a bowl.
2.      Heat wok over medium heat. Dry roast the mixture till well cooked. Dry roast is best when you can see the mixture slightly pinkish and you smell the dry roast aroma (सोंधी खुशबू). Remove from the wok. Add salt into the dry roasted powder and set aside for later use.
3.      Clean okras under running water. Pat dry them. Make sure they are completely dry with no water left out.
4.      Slit lengthwise each okra. OR you can cut and make pieces of all the okras lengthwise.
5.      Heat 4 tsp of oil in the wok over high heat. Put in okras into the wok and toss it at regular interval. You will see the okra is releasing its gluey liquid. Stir the okras till the gluey liquid is almost gone. Remove the okras from wok and keep aside. At this stage the okras are almost half cooked.
6.      Take 4 tsp of oil again into the wok and heat over medium flame. When the oil is hot add the fenugreek seeds, carom seeds and onion seeds.
7.      Add in the ginger slices. Stir for few seconds, then add the sliced onions. Stir fry till golden brown.
8.      Now add the half cooked okras. Toss to mix it with red fried onions well.
9.      Reduce the heat to low.
10.  Sprinkle some of the roasted powder. Toss the okras for a half a minute. Sprinkle again some of the roasted powder and toss. Repeat this till you are done with all of the dry roasted powder. *
11.  Cook over low heat till the okras are fully cooked and the outer is crispy.
12.  You made it ! The crispy okras are ready to eat J


Serving
Serve hot with soft chapattis or parathas or kulchas.


* Adding the dry roasted powder gradually in intervals, makes sure the seasoning is mixed properly to each okra. Also, since the powder coating over okras is done in intervals, they come out crisper.


Try this recipe and share your comments and/or suggestions.


Monday, December 24, 2012

Lemon Chicken Breast


Lemon Chicken Breast


Ingredients
§         Chicken Breasts   – 2
§         Garlic                 – 6 cloves (finely chopped)
§         Oil                     – 5 tbsp
§         Coriander leaves – ½ cup finely chopped
§         Mint leaves         – ¼ cup finely chopped
§         Lemon juice        – 2 tbsp
§         Butter                – 1 tsp (1 small cube) (optional)
§         Salt to taste
§         Pepper powder   – ½ tsp
§         Green chilies     – ½ tsp
§         Honey                – 1 tsp (diluted it in 1 tsp water)
§         Water                – 2 tbsp


Method
1.      Marinate the chicken breasts for few hours. Roughly around 2 hours.
  • Mix 4 tbsp of oil, half the amount of chopped coriander and mint leaves, and 4 chopped garlic gloves.
  • Coat the chicken breasts with the marinate mixture well.
2.      Take a frying pan. Heat 4 tbsp of oil over medium heat.
3.      Place the chicken breasts and sprinkle salt and black pepper powder.
4.      Cook approximately 4 to 5 minutes each side. 
5.      Remove the breast pieces, when done.
6.      Lemon sauce :
  • Oil will be remaining in the frying pan after you are done with chicken breasts. For the sauce you just need 1 tbsp of oil, so remove the excess oil if you feel the pan is having.
  • Over medium heat, tenderize the remaining chopped garlic, coriander, mint leaves and green chilies. Add in salt and pepper to taste.
  • Add in the lemon juice, honey and water. Reduce the heat to low. Cook for about a minute. You can add the butter now, if you like. Let the sauce reduce a bit.
7.      Put the chicken breast again into the pan. Give it a quick flip and coat the breast pieces with the sauce.
8.      You are DONE ! J


Serving
§         Serve the lemon chicken breasts with any flavored rice (say, veggie rice, cumin rice, or peas rice).
§         Instead serve with mashed potatoes and crispy garlic bread.


Try this simplest recipe and share your comments and/or suggestions.


Friday, December 21, 2012

Crispy Potato Rounds (आलू की लच्छेदार टिक्की)


Crispy Potato Rounds (आलू की लच्छेदार टिक्की)


Ingredients
§         Potatoes            – 2 medium sized (grated)
§         Onion                 – 1 medium sized (thinly sliced)
§         Radish                – 4 tsp (grated)
§         All purpose flour   – 1 tbsp
§         Eggs *           – 1
§         Salt
§         Pepper powder    – ½ tsp
§         Green chilies      – 1 tsp
§         Chaat masala       – ½ tsp
§         Oil for shallow frying the potato rounds


Method
1.      Grate the potatoes and radish. Dip it in a bowl of water, so that they don’t oxidize.
2.      Beat the eggs.
3.      Mix the flour, salt, pepper powder, green chilies and chaat masala into the beaten egg. Keep aside.
4.      In a mixing bowl, squeeze out the grated potatoes and radish (squeeze thoroughly).
5.      Now add into the egg mixture. Mix well.
6.      Take oil in a shallow pan, over medium heat. Not much of a oil is needed. Just sufficient enough for shallow frying the potato rounds. (cover the bottom of the pan with oil. This should be enough for shallow fry).
7.      Now the frying part ! Take small amount of mixture on your greased hands and give it a flattened round shape. Gently place it into the pan and shallow fry it.
8.      It takes approximately 3 to 4 minutes each side. The done rounds are golden brown crisp and the inner potato shreds are soft and mushy.


Serving
§         Serve hot with Spicy Onion-Tomato Chutney or any other chutney of your choice.


* Eggs can be replaced by 2 bread slices. Dampen the slices a bit and squeeze out excess water. Crumble the bread and mix it with the potato-radish mix.


Try this recipe and share your comments and/or suggestions.


Thursday, December 20, 2012

Spicy Onion-Tomato Chutney


Spicy Onion-Tomato Chutney


Ingredients
§         Onions                – 4 medium sized (thinly sliced)
§         Tomatoes            – 4 medium sized (chopped into small chunks)
§         Cinnamon stick     – about 1 inch long
§         Cloves                – 6 buds
§         Garlic                 – 6 buds (finely chopped)
§         Dry red chilly       – 10 nos.
(can increase/decrease based on the amount of chilliness needed)
§         Tamarind juice     – 2 tsp
§         Oil                     – 6 tsp
§         Salt to taste

For Tampering :
§         Mustard seeds     – 1 tsp
§         Green chilly         – 2 nos. (diced)
§         Oil                     – 6 tsp 


Method
1.      Heat oil in a wok over medium flame.
2.      Add cloves and cinnamon stick. Stir a bit and add onion slices.
3.      Fry the onions till golden brown. Remove the contents from the wok and let it cool.
4.      In the left over oil, fry the red chilies a bit.
5.      Add garlic and fry till red. Now stir in tomatoes & salt. Cook till soft.
6.      Lastly add the tamarind juice and cook for a minute. Let it cool.
7.      In a mixer, grind the fried onions and the cooked tomatoes to a paste.
8.      Tampering (Tadka/Chaunk in Hindi) :
  • Heat 6 tsp of oil in a wok. Add mustard seeds and let it crackle. Add the green chilies and stir a bit.
  • Pour in the onion-tomato mixture into the wok. Cook for 5 minutes over medium heat till you get a thick consistency. *
9.      Spicy onion-tomato chutney is ready to be served with the food of your choice

  
* Make sure there is no water content left in the thick sauce. This way it can be stored in refrigerator for more than a weeks time.


Try this recipe and share your comments and/or suggestions.


Wednesday, December 19, 2012

Bread Pizza


Bread Pizza


This is one of my favorite recipes. I make bread pizzas quite often for breakfast. They are quick as well as quite filling, nutritious and appetizing!!


Ingredients

§         Assorted veggies  – 1 cup, chopped very finely *
§         Milk                    – 6 tbsp **
§         Semolina (Sooji)   – 5 tsp  ***
§         Bread                 – 5 slices
§         Pepper powder     – ¼ tsp
§         Salt                   – as per taste
§         Ginger                – ¼ tsp grated
§         Chaat Masala      – ½ tsp
§         Green chilly         – ½ tsp (can increase/decrease based on chilliness required)
§         Cheese               – ½ cup grated (Optional)
§         Oil/Butter for cooking


Method
1.      Topping
  • Mix together all the veggies, semolina, salt, pepper powder, green chillies, ginger, chaat masala (All the dry ingredients) 
  • Add 2 tbsp of milk and mix. Add another 2 tbsp of milk and mix. Add rest of the milk (2 tbsp) and mix the ingredients properly. Do not put all the milk in one go. Refer ** (below) if semolina granules are quite coarse. Make sure the topping is thick paste.

2.      Divide the topping mixture in 5 parts.
3.      Spread the topping on the bread slices evenly.
4.      Grease the griddle with oil or butter. Heat the griddle on low-medium heat.
5.      Place the bread slices over the hot griddle.


6.      Baste*** little bit of butter or oil over the bread topping.
7.      Instead of basting with butter/oil, you can spread a generous amount of grated cheese.
8.      Flip the bread slices when they are crisp and golden brown. Flip it fast! Flipping should be done very carefully as the topping may slip off the slices.
9.      Press the bread slices a bit so that the topping clings to the bread, cooks evenly and has smooth surface.
10.  Cook till it’s done. It takes approximately 1 to 2 minutes each side. When cooked the surface becomes crisp and veggies soft and mushy in texture.

Serving
§         Serve hot bread pizza slices with chutney and/or any tangy sauce.  


*   Pick soft veggies like Capsicum, Onions, Cabbage, Carrot, Sweet Corn etc. Choosing the veggies is totally upto your taste J. If you choose veggies which take long to cook, then blanch them before adding them to other soft veggies.

Cut the veggies before hand, a day before or so, and your preparation time reduces to just few minutes!! J

** If the granules of Semolina are quite coarse, then increase the milk amount by 2-3 tbsp. Milk is required to bind the veggies and semolina into a thick paste. So you can alter the amount accordingly to get the desired thick topping.

*** Sooji – In Hindi language semolina is termed as sooji. 
      Baste - To brush or spoon liquid over a food before or during cooking.


Try this quickest and simplest recipe and share your comments and/or suggestions.


Friday, December 14, 2012

All About Brining


What is Brine ?
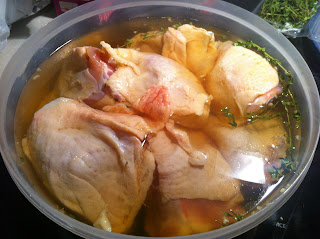
Brine is a mixture of equal parts of salt and sugar in cold water. Brining is similar to marination, wherein the meat/poultry is soaked in brine for hours before cooking.


Why Brine ?
If one is looking for a very moist juicy meat, then brining is the answer. It adds moisture to meat, making it even more plump than its natural tenderness. Since brining adds in extra moisture to the meat and locks it in, the resulted cooked meat is delicious moist and juicy. Basically it prevents the meat to dehydrate while cooking.

-   How to Brine ?
-         In a large enough container, which can submerge the meat completely, mix equal amount of salt and sugar in COLD water. Generally 1/8 cup of table salt per one liter of water is enough for brining.
-         Sugar, not only helps in neutralizing the salty mixture, but also in caramelizing the meat while cooking.
-         Soak the chicken into the brine and refrigerate it for a minimum of 2 hours to a maximum of a day.
-         One can add extra seasoning into the brine to spice up the flavor. Example : crushed garlic, ginger, crushed pepper etc.


How does Brine work ?
Brining meat acts at the molecular level. Brining leads to hydrate the cells of its muscle tissue by the process of Osmosis and then making the cells to hold on to the water by the process of denaturation. 

Explanation in detail :
Definition of Osmosis is, when a solvent moves from a low solute concentration to a high solute concentration (salt water in this case) through a semi-permeable membrane to form equilibrium.

Well in that case, the action should have been the reverse. The low concentration salty fluid from meat cells should have flowed out to the higher concentration salty water of brine, resulting into even more dry meat ! But in reality we get hydrated tender meat, which is even more salty! So definitely something more happens……

Due to osmosis, the water flows out of the meat, but salt ions flow in by the process of diffusion. These salt ions then break the proteins in the meat cells, i.e. it denatures the protein cells. The denatured protein molecules become even more concentrated and the solute level thus rises within the cells. This then causes the reverse water flow and hence additional water flows into the meat. 

Now you may ask, if this process of water going in and out of cells continues, to maintain equilibrium then when does it stop to keep the meat hydrated with the water locked in? The answer to this is, the denatured protein cells are larger molecules and so these larger molecules cannot flow out of the cell membrane. So osmosis causes even more water to flow in. This continues till the osmotic pressure is reached to nullify the osmosis. 


Hope Brining Cooking Technique explanation helped you understand your cooking even better !! :)


Thursday, December 13, 2012

Juicy Orange Sauce Chicken


Ingredients
§         Chicken breast    – 2 skinless boneless breast pieces

For Orange Sauce
§         Orange Juice       – 200 ml
§         Lemon Juice        – ½ tsp
§         Butter                – 1 tsp
§         Ginger               – ½ tsp Grated
§         Honey                – 1 tsp

For Marinating Breast pieces
§         Black Pepper       – ½ tsp (Crushed Coarsely)
§         Salt                   – ½ tsp
§         Oil                     – 1 tsp

  
Method
1.      Preheat oven to 170°C.
2.      Make two packets/cradles of aluminum foil for each breast piece. **
3.      Marinating breast pieces :
  • In a small bowl mix black pepper, salt and oil.
  • Make small diagonal cuts on each breast piece.
  • Rub the chicken breast pieces with the pepper mixture thoroughly.
  • Cover the bowl with plastic wrap and refrigerate it for 2 hours.
4.      Orange Sauce :
  • Melt butter into the saucepan over low heat.
  • Add ginger and stir for few seconds.
  • Pour the orange juice, lemon juice and honey. Stir occasionally and cook for 2-3 minutes. Keep aside.
5.      Place the chicken breast, into the aluminum packet/cradle each.
6.      Divide the orange sauce in two portions and pour it over each breast piece. Coat both sides of the piece.  
7.      Grease the baking sheet** with little butter or oil. Place each cradle on the baking sheet and cook for 30 to 40 minutes or until chicken is fully cooked. Baste the breast pieces with the sauce every 10 minutes.

** Not feeling comfortable with the idea of aluminum packet/cradle & baking sheet? Opt for a small baking dish which is about 1-2 inches deep, to ensure sauce does not spills out while cooking is in progress and during basting.


Serving
§         Serve hot orange chicken with steaming hot plain rice.
§         Accompany the meal with few tossed or grilled veggies for a complete vitamin packed meal.
§         Your feast is ready in no time!! Quick and easy recipe.  


Try this quick and simple chicken recipe and share your comments and/or suggestions.